Sweet Lilly Sew Along Day 2: Front Bodice Construction
Welcome to Day 2 of our Sweet Lilly Sew Along! Today is all about front bodice construction.NOTE: Follow the whole step 1 of the pattern tutorial if you are making the bodice with bodice bands! Skip the part of cutting and interfacing back and front bodice bands if you are making the hack version!
Steps 2-4
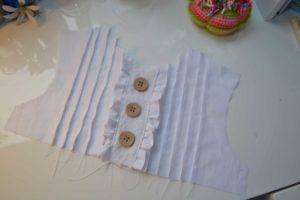
Perfect! Let's create pintucks. Follow step 2-4 of the pattern tutorial to create and complete the pintucks on your front bodice. When you are finished with step 4, your bodice should look like this. Eek love it!

Steps 5-6
Now let's go ahead and sew the Front bodice ruffles. Follow step 5-6 of the pattern tutorial to prepare bodice front ruffles.Note: If you are making the version without lace on the center front bodice (the original version) continue with step 7-11 of the pattern tutorial! If you want the hack version with lace overlay, follow this tutorial after step 6 (don't continue with step 7-11 just yet!).
Before you continue with step 7-11 of the pattern tutorial, you will want to cut another center front bodice on fold using lace fabric. Refer to the photo below:

Then, baste the lace center front bodice and the main center front bodice together, both right sides are facing up! Refer to the photo below:

Steps 7-11
Love it! From here you can now continue with step 7-11. When you are finished with step 11, your bodice should look like this:
I'm so loving this so far! Now, let's go to the next step! Full bodice construction! But first, decide if you want to add bodice bands or skip them, add sleeves or go with the sleeveless look before you continue next!!!
Original version: If you are attaching the bottom front band to the front and back main bodice with sleeves, please follow step 12 - 14 of the pattern tutorial.
Sleeveless version: For this version don't sew the side seams yet in step 13! We will follow this Burrito method to sew the sleeveless version. After sewing the sleeves using the burrito method you can then complete step 13-14! You are done for today! This is the end of the Day 2! You did it. Admire your work for a minute! See you tomorrow for a sleeved version tutorial!
